
What to look for when conducting spring stand assessments
Give the plants a chance to wake up.
Wait for at least three warm (above 15C) days after the snow goes away. It can be done sooner, but may be difficult to determine the live plants if you look too early. Leave the replant decision as late as possible to accurately determine plant stand and plant health (wait until you cut your lawn once).
Quantify your plant stand. Calculate the average number of plants per foot of row.
Determine the length of one foot of row (carry a 12” clipboard, a tape measure, or know the length of your boot). Place between two rows of wheat and count the number of plants on either side (be careful to count plants, you will need to dig up a few to check for tillering). The healthy plants were likely seeded close to 1” deep. Do this for 10 random spots in a field. Make it random, but also make it representative. Try to avoid old wheel tracks, guess rows, knolls, or valleys. Once you have 20 counts (two counts at each of 10 spots), take the average. Pub 811 shows research that 7 plants per foot of row will still produce a 90% of the yield of a full stand. The Wheat Team’s cut off point is 10.
- 7 plants/ft or less – terminate it
- 8 to 10 plants/ft – carefully weigh alternatives
- 11 plants/ft or more is worth keeping
Pay attention to the uniformity too, many large gaps or bunches are not good. Ideal count would be 15 uniform plants in a foot of row. A strong stand with full potential would be to have 450 – 600 good heads per square yard. If most plants will make between two and three good heads, this equates to a requirement of 12 – 17 plants per foot of row.
Quantify your winter kill or drown out areas.
Often, these areas look worse than they really are. If you have three areas that are 20 paces by 60 paces in size, this is still only a total of 0.75 acres. This is less than one percent of a 90 acre farm. If less than 10% of the field is killed out, but the majority looks good, keep it. Consider reseeding another spring grain in these areas and harvest them separately for forage or feed grain.
Understand your reseeding options.
If your stand is not acceptable, what makes sense to grow in its place? Can your harvest equipment handle more of a different crop? Do I want to grow another year of soys on that farm? If Plan B is spring wheat, it will do best if it is planted early, so be ready. Will you spray off the winter wheat pre-pant or pre-emerge?
Understand your Crop Insurance procedures if you wish to terminate the stand.
If you see that you may have a problem, understand the processes involved so that you are not slowed down when it comes time to make the corrective action. Who do you need to inform? When do you need to inform them? Do you need to take pictures?
Identifying growth stages
In Ontario, the Zadoks Scale is used to determine the development of cereal growth stages. The stages of development are broken up into 10 categories ranging from germination to ripening. It is key to understand the Zadoks scale in order for certain management practices to be timed/applied properly. Another development scale used is the Feekes scale; however, this scale is primarily used in the U.S.
- Germination (00-09)
- Seedling Growth (10-19)
- Tillering (20-29)
- Stem Elongation (30-39)
- Booting (40-49)
- Heading (50-59)
- Pollination (60-69)
- Milk Development (70-77)
- Dough Development (80-87)Ripening (90-99)

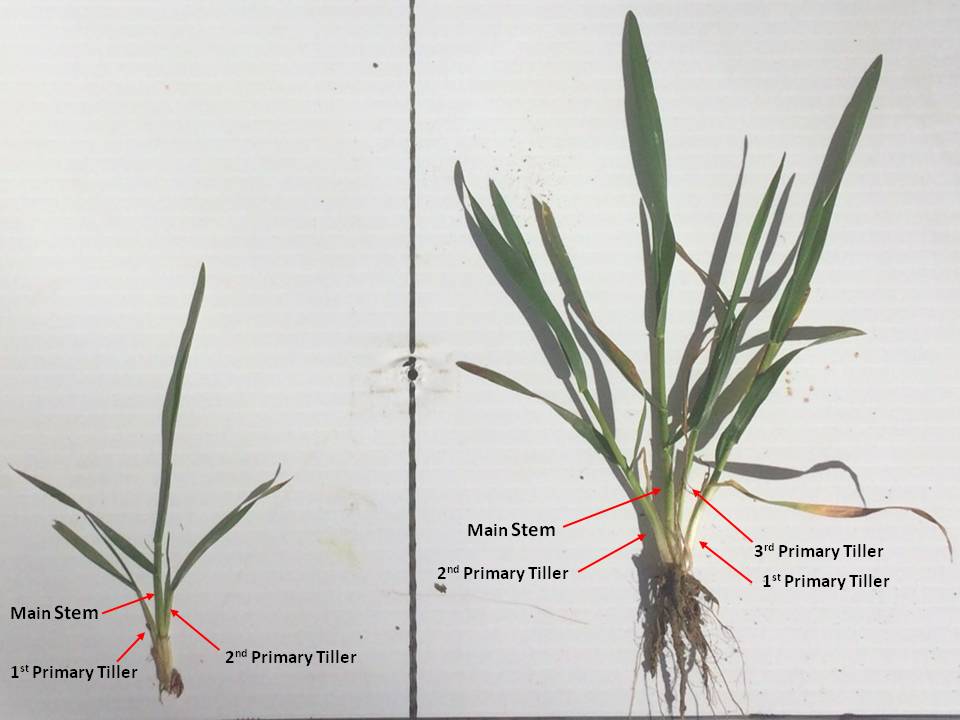
In the above image, examine both plants. On the left, the field was planted Oct. 21 and on the right the field was planted on Oct. 3. Using the Zadoks scale the plant on the left is GS 22 (main shoot + two tillers) and the plant on the right is GS 23 (main stem + three tillers). The tillering stage determines the amount of heads per plant. Under good conditions and management, winter wheat plants can produce one – two spring tillers.
Zadoks stage 30 is when the plants switch from vegetative growth to reproductive growth. The growing point is now at the soil surface. If you cut the plant open with a knife, you will find a node right at the base of the plant. Damage from heavy equipment at this stage can negatively impact yield. At this point in development, tillering is complete and the plants will begin elongating. GS 30 is a critical stage because the plants are determining the number of florets and seed size for the head.
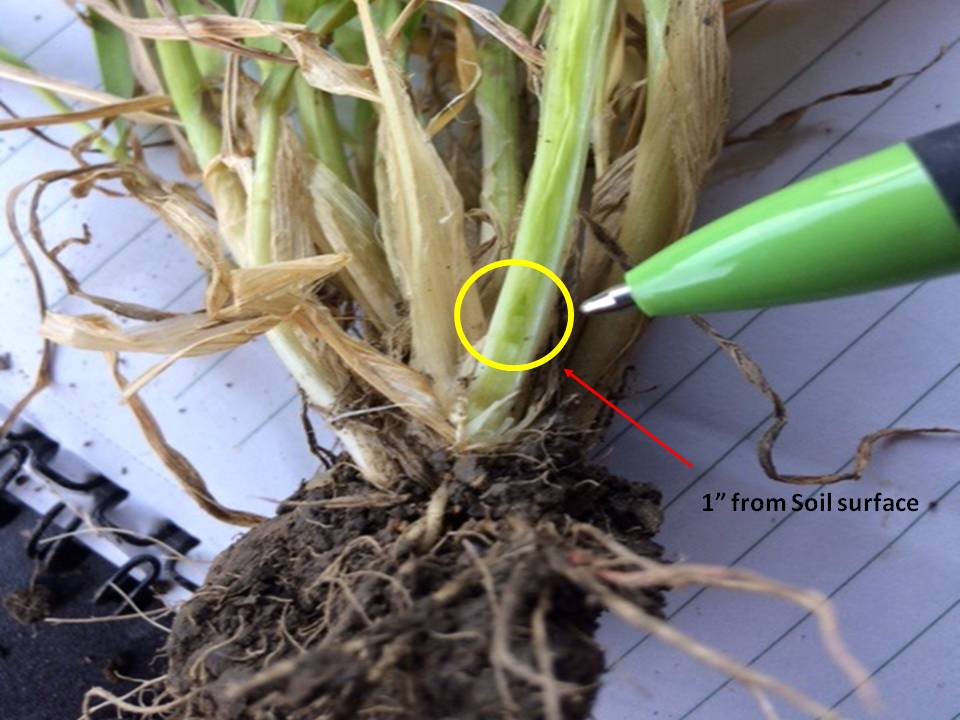
Zadoks stage 31 is when the first node is visible on the stem. Generally the node will be one inch from the soil surface up the stem. Use knife or crunch the stem between your fingers to feel the node. See below image.
Zadoks stage 32 is when the nodes start to separate along the main stem. The second node is now detectable along the main stem. For soft red winter wheat, the second application of nitrogen should be applied by this stage. Use your knife to cut open the stem to visually see the node or use your fingers to crunch along the stem until you feel the first node then crunch approximately one more inch and you should feel the second node. See below image.

Tools to Carry:
- Tape measure
- Trowel / shovel
- Clip board (pen/paper)
- Boots (spare pair as well)
- Cleaning tools (prevents spread of weed seed, diseases and insects to neighbouring fields)
- Sharp Knife (be careful!)
- Phone (take some cool wheat pics)